Create a realistic depth of field
Every person wants to capture images as good as a Photographer. Unfortunately, sometimes images tend to be simple when captured. For manipulatimg these images, Adobe Photoshop has updated its new feature Blur Gallery. With this feature, photographers/ designers can simply manipulate an image so the focus is on a particular subject as a result of depth of field. We can achieve different effects via Blur Gallery tools. Lets check it out with an example.
Blur Gallery
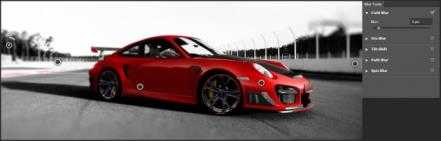
We have taken the image of a car below as a sample.

Go to “Filter > Blur Gallery > Field Blur “. A Blur tab pops up where you can adjust various blur effects.
The first effect we will apply is the Field blur. Click on the image to place blur fields. You can add as many points as you like. In our example image we have placed 5 Blur points. Each blur point can be controlled separately with different blur values.
Tilt shift blur
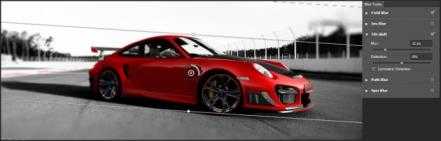
The next feature we will use is the the option “Tilt-Shift”. This relates to the foreground and background blur. By dragging the lines, we mark the area for focus. The remaining part of the image will automatically get blur. The blur value in the image below is set to 12.
Spin blur
Finally, we tick the “Spin Blur “. With this tool we blur the selected area by spinning the pixel. The spin blur effect often is used in car wheels to show a spinning effect. In our example image we set the spin blur value at 18.

By playing with the depth of field you’re able to manipulate your images in such a way that they appear more professional. Just try for yourself!